When the word comes Photoshop pen tool, we will imagine, is it works like a pen? From the work angel, it works like a pen. When you wish to draw something, you need a brush or a pen to sketch. In Photoshop, the pen tool also works either for drawing or sketch. The importance of using the pen tool is significant. Every professional person or photo editing company use photoshop pen tool while providing clipping path service to their clients. However, if you don’t know much about this tool, we will cover it in this lesson. Today we will illustrate everything about the Photoshop pen tool and its uses. After reading the full article, you will be the master of this fantastic photoshop tool.
The fundamentals of the Pen Tool in Photoshop
What is the Photoshop pen tool?
In Photoshop, the pen tool always works to select the subject from the object. With by pen tool, you can choose anything from simple to complex. It is not like the brush tool or pencil tool. Photo Editors randomly use this tool for creating smooth edge selection like vector paths. When you draw something with a pen tool, it will automatically create a “work path” in the path panel.
What are some common uses for the Pen Tool?
The primary uses of a pen tool are for the removal of background by clipping path. When there is needed to erasing the background, the pen tool will be the first choice. It would become your most handy tool. For example, to select only one button from a shirt for color correction, the pen tool will help you.
You can make any shape with a pen tool. Since it is working as a vector path, you can create forms by a path like fish, boat, house, shirt, pants, etc. This option gives you to create a custom shape for highlighting a specific part of the image. You will get extra advantages from the path like reuse, store, and modify when needed. You will find another custom shape option called rectangle tool, round rectangle tool, ellipse tool, and polygon tool.
Where is the Pen Tool in Photoshop?
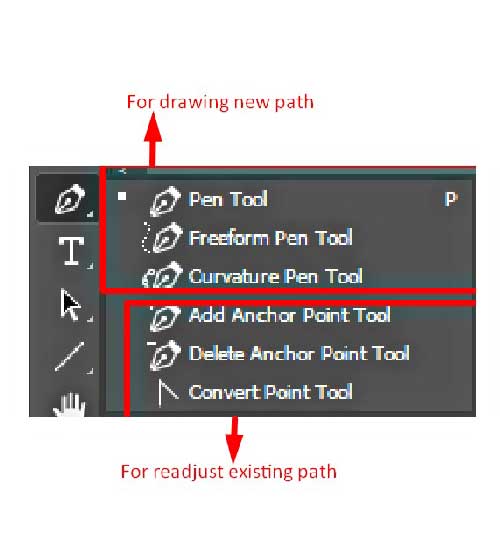
You will find the pen tool on the left side lower half of the toolbox. While you select the pen tool option from the toolbox, you will find different types of pen tool in Photoshop. There is a total of six options in the box. They are:
1. Pen tool
2. Freeform pen tool
3. Curvature pen tool.
4. Add anchor point too
5. Delete anchor point tool.
6. Convert point tool.

If you are a user of the older version, there will find five options.
You can select the pen tool by default—just press “p” from the keyboard. The pen tool will auto-selected. It is the Photoshop pen tool shortcut.
Where is the Paths Panel in Photoshop?
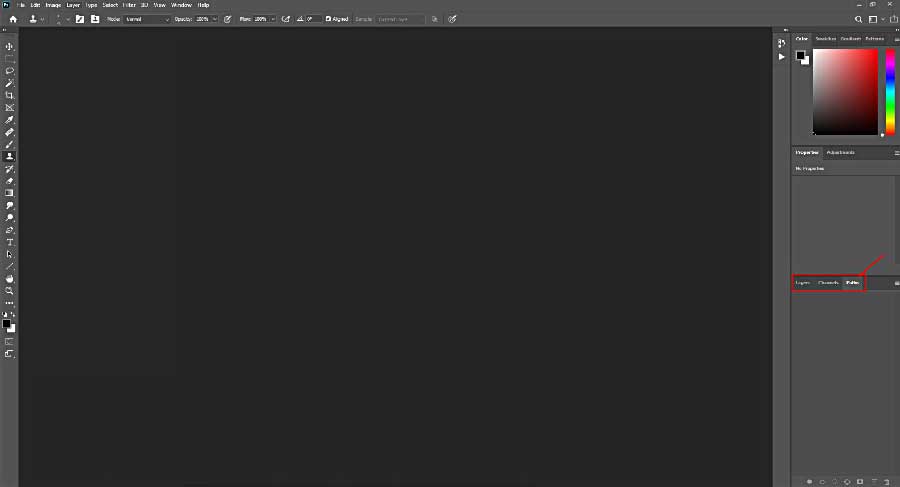
When you draw a path in the selection process, the path will create a new path layer in the path panel in time. So you need to visible the path layer. You would find the path layer in the workplace essential. To activate the essential workplace, go to the top drop-down menu bar and click Window > Workplace > Essential (default):
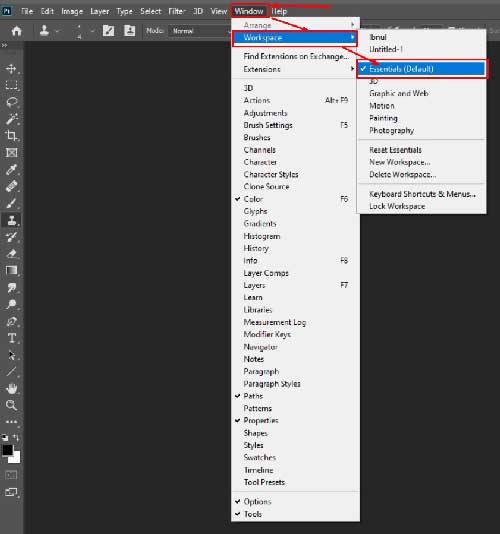
When you select the essential (default), the Photoshop software automatically generates some default panels at the right site. You will find the path panel at the bottom site to see another layer named layers and channel. Select the path panel:
If you did not find any path, then you need to select it manually. To visible the path panel manually, go to the top menu bar and click on Window > Path:

Pen Tool settings overview
We are discussing on pen tool with the Photoshop CC 2020 version. Photoshop CC 2020 has three different types of pen tool used for creating a path:
1. Pen tool – It is used to draw any clipping path by hand.
2. Curvature pen tool – used to draw any curve portion correctly.
2. Freeform pen tool – to mark something, this tool is used to make a path for showing quickly. You can use it to give an example when you teach someone to show a particular part of something.
The freeform tool will convert as a magnetic tool when selecting the top sub-menu bar’s magnetic option.
You will find another tools option just below the pen tool options. Those tools are used to readjust the current path to add and delete the anchor point tool.
After select only the pen tool, you should be setting either path or shape from the top sub-menu bar. Saying selection on the path, when you draw a path, you will get a new work path in the path panel.
And drawing a path while the selection is on the shape will create two paths. One is in the path layer named “shape 1 shape path.” Another is in the layer panel called “shape 1.”
You will find some more options for changing shape like fill, stroke, stroke thickness, and path operations in the shape selection. You can change the path by adjusting these options:
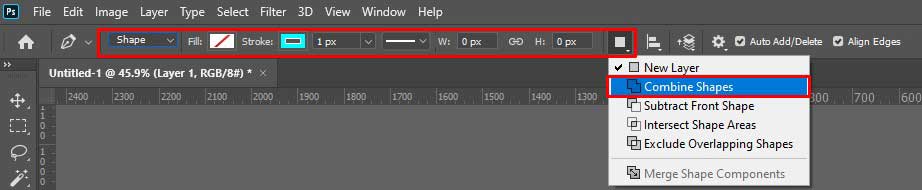
In the selection of path, you will get only one extra option named path operations. From here, you have to select the combine shapes option. They are marked as two overlapping squares:
There you would find some other options. But for their default value, you should leave them in this tutorial.
Uses the Pen Tool in Photoshop
The pen tool gives you the benefits of creating any path entirely, either straight or curved, and zigzag. But to be an expert, anyone should need to practice a lot. But don’t be hopeless as a fresher. Nobody is an expert from the beginning. For mastering Photoshop in pen tool, practice more, and become perfect. Remember, you have plenty of options to readjust the path to give an ideal shape.
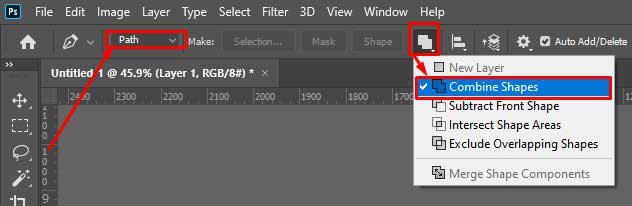
For selection something when you are going make a path, you should select three primary options:
1. “Path” from the below of top drop-down menu.
2. “Exclude Overlapping Shapes” from Path operations.
3. from the right side of the bottom layer panel, select “path.”
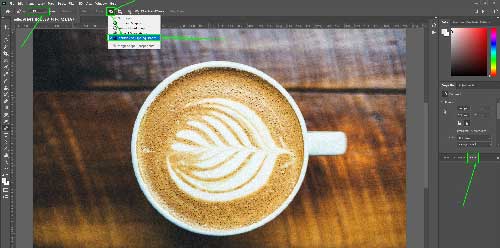
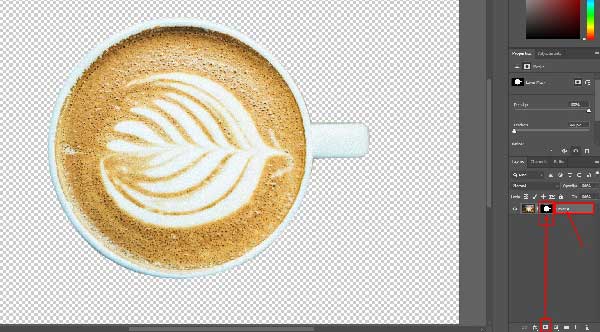
You can download the image from the below link:
https://pixabay.com/photos/coffee-cafe-mug-decorative-drink-983955/
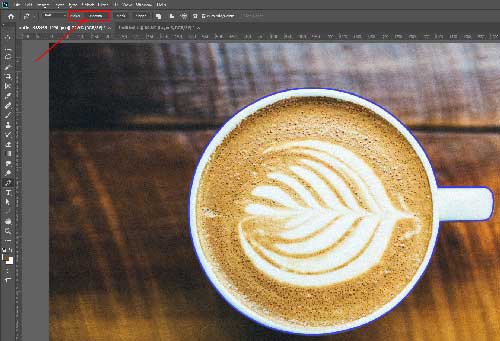
How to use Photoshop Pen Tool for creating a path
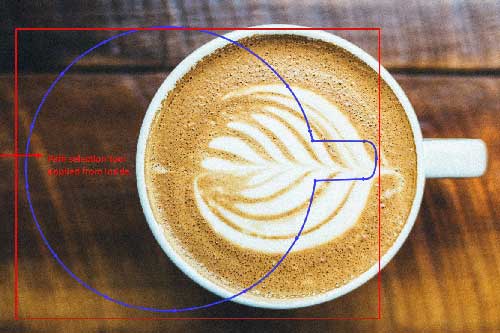
Now your path journey is starting. To draw a path, first, you have to click the outer edge of the target image. Remember, do not include the background in your path drawing. With a real pen, you can draw a picture like overlapping something without removing the pen. But in Photoshop pen tool has an automated line that needs to decorate. Like make and set the puzzle one after one where the line is perfect and adjustable.
Creating a new clipping path with the Pen Tool
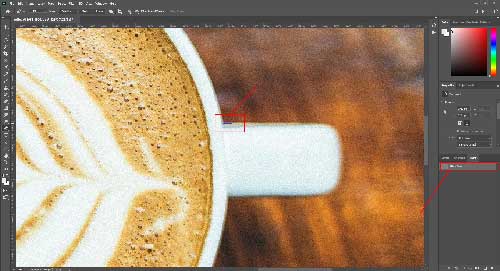
First, start the path from any straight line of the cup because it will give you confidence. When you click the image, there will create a new layer named “work path in the path layer.”
How to Zoom In and Zoom Out image
You can zoom the image to see the edge by pressing “CTRL+” from the keyboard. If you want to zoom more, then press again until the image comes into clear view. But when you zoom the image, the image will be covered by a Photoshop border. So, you cannot see the next portion. In that case, you need to use the hand tool to move the image.
Press and hold the “space” key from the keyboard. As a result, you will see the mouse pointer transformed in hand from the pen. You can move the image by drag with your hand then glide. For zoom out, just press CTRL+0(zero)” from the keyboard. The image will go in its original size.
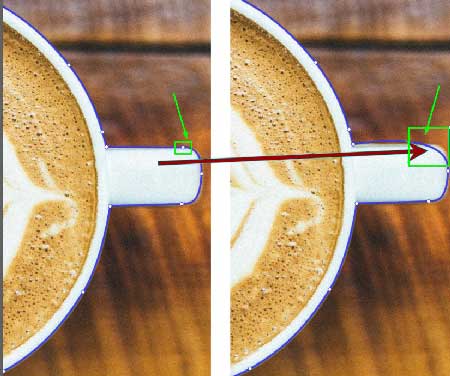
Creating a straight path segment
When you click on the image, an anchor point will automatically create at the starting point. A continuous line from the pen will be walking wherever you guide the pen. So, go straight across the cup handle and make another anchor point before the curve starting edge point:
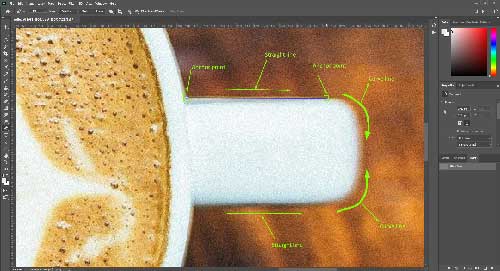
How to create a curved path segment with the Pen Tool
Now, how will you create a curve path in this segment? Firstly, think and measure how long the curve you will create the path. Make another anchor point on that edge, and do not release the mouse pointer without releasing the mouse pointer move across the curve line. You will see the straight path converts into the curve path. There you will find two handles of the anchor point, called curve handle. You can adjust the curve line by this handle:

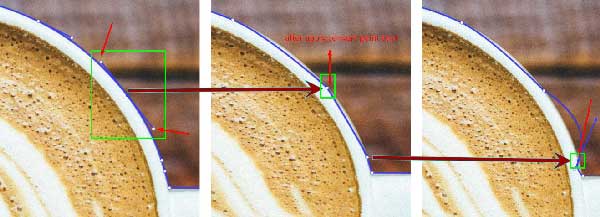
Creating a straight path segment after a curved path segment with the Pen Tool
You have to keep in the observation that where is the straight line and curve line. In the curve line, you have to make the curve path to apply this handle technique. Otherwise, in the straight line, you can draw the path by the apply only the anchor point. So, from the curve line, you need to back to the straight line. Similarly, make an anchor point on the start point of the straight line and adjust the curve line by making a handle:
Again when the straight line starts, you need to close the last handle that is faced on the straight line because it will make the straight-line curve. To safeguard the line and close the handle by pressing “ALT” and hold, click on the last anchor point. The second handle will remove:
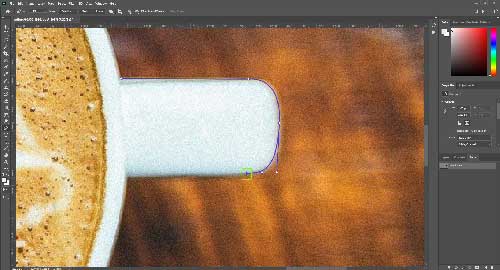
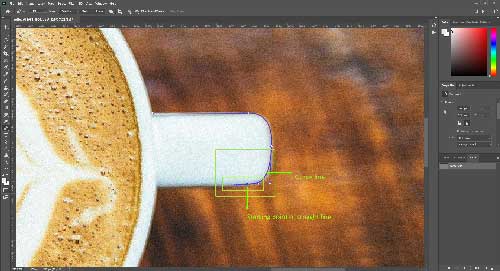
Closing your clipping path with the Pen Tool
For closing the clipping path, you have to draw the path ultimately. While completing the clipping path, you have to join the last anchor point with the first anchor point you have drawn. Once you join the two anchor points, you will notice that the path line has vanished. On the other side, in the “work path” layer, an outline shape has created:
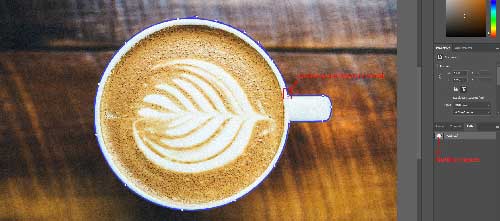
How to rename and save your path
It is essential to work now, that is, give the exact title of your created path. If you forget to provide the title of your path, you can lose your current path. For example, if there are two coffee cups, you have to make an outline path. If you do not save your first path, then the second path will eradicate your first path. In the circumstances, you may lose your hard work.
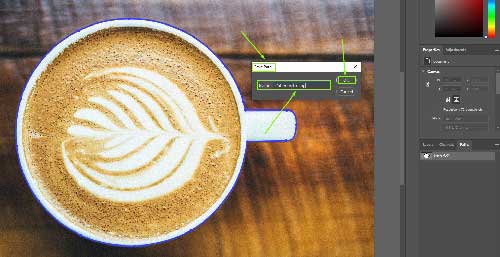
To rename and save your work path, select and double click on the work path. You will find the rename and save box:
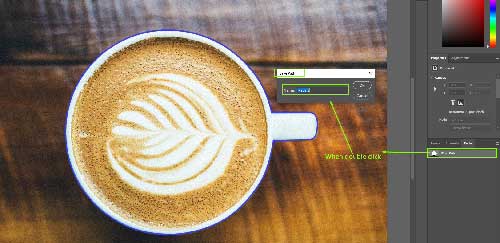
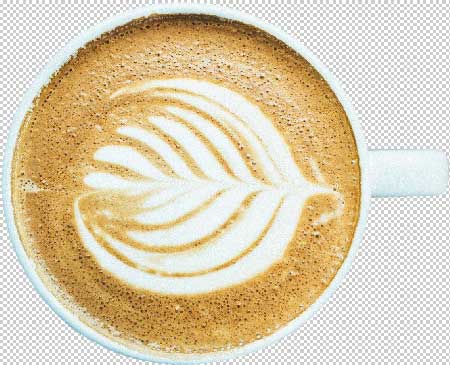
Now give a title like “Coffee with cup,” then click ok. The work path will convert to “Coffee with cup”:
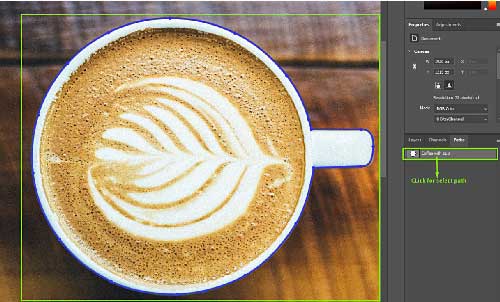
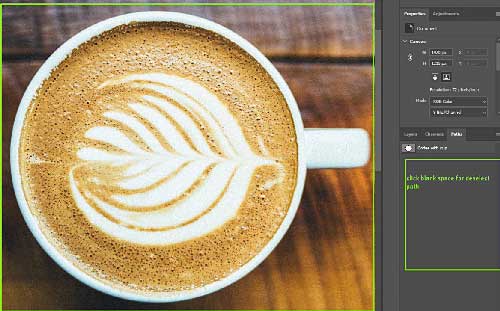
How to select and deselect the existing path with the Pen Tool
It is effortless to select and deselect the path. When clicking on the saved path named “coffee with cup,” the path will appear. If you click on the blank space just below the selected path, then the path will deselect:
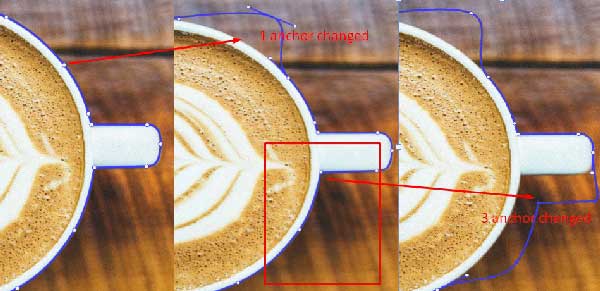
The way of modifying an existing path with the Pen Tool
After completing the path, you can modify the path with the adjust tool. What kind of modify you need? Generally, path changes mean a correction of the existing. Suppose the current path either go across the outside from the cup line or deep inside. Then, it needs to readjust. Otherwise, it looks distorted and fake. You can change the existing path shape by using the following three modified tools. That is next to the pen tools option:
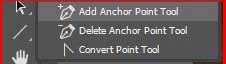
Add anchor point
With this tool, you can add an anchor point to change the shape or adjust the path. First, select the “add anchor point” from the toolbox of Photoshop, then add the point where you need:

Delete anchor point
You can delete any unnecessary anchor point. To make the path lite, use possibly fewer anchor points. Less anchor point makes the path attractive and smooth. Select the “delete anchor point” from the left side. Then click on the marked anchor point which one you want to delete. Remember, this is just for showing the change. Because our path is ok and no need to change:
Convert point tool
By convert point tool lock any anchor point by removing the anchor handle. When you click any anchor, which was including a curved handle, the handles will disappear. So, you can modify the straight or curved path along with the next handle:
Step to add additional paths to a current path using the Pen Tool.
Whatever in this image, there is no inside gap shown? In the path section, you will face lots of inside holes in other photos. So, you have to make the gap path. You can make it as usual as the general path. When you outline, the path line will disappear until you make a new anchor point for another path. Before creating the gap path, select the path panel first.
How to modify existing anchor points and curves along a path
In Photoshop, you can adjust the path in lots of ways, either manually or systematically. So, here I will discuss two more options on change the existing anchor point with the curve. In Photoshop, when you notice the toolbox’s left side, you will find an arrow icon just below the “T” icon. It has two sub-options:
1. Path selection tool (look like a black arrow).
2. Direct selection tool (look like a white arrow).
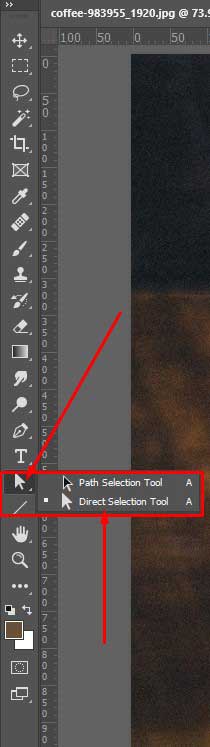
1. Path selection tool
With the “path selection tool,” one can select the whole path to move anywhere. You can select some portion or particular anchor point to change its direction with this tool. After taking the “path selection tool,” if you put the cursor inside the path, then drag it to another, the entire path will move along with the cursor. You cannot change any particular portion with this tool:
Direct selection tool
This tool is handy for change a particular anchor point; anchor handles one by one. You can also select half portion of the path. If you want to choose two or more anchor point, then you can select with this tool.
While you want to select more anchor points together, you need to drag the mouse cursor outside of the path. When you skate towards the desired anchor point, a box will appear and take all anchors into the box and then release the cursor.
As a result, you will get all anchors in selection. Now, drag and move the mouse cursor inside or outside; you will see path will also move with the cursor. In a word, with a direct selection tool, one can change the path shape manually. We will show you how it works:
How to make a selection from a path
In this section, we will discuss how to select a path. And why we need to select the path? Generally, the selection needs to remove the background from its subject. Selection is also a need to transform the background. You can make the selection of any path in 3 ways:
1. Selection from layer toolbox:
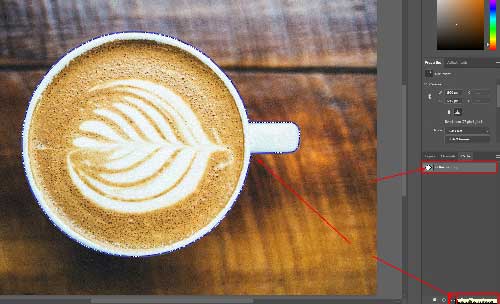
Creating selection from the path, you can use the layer toolbox. Go to layer panel right side of Photoshop. You will notice below the layer there are some tools. From there, click a circle shape tool that is called load path as a selection. When your path is in fair condition, then this tool will allow you to make a selection. Otherwise, the tool will be in an inactive state:
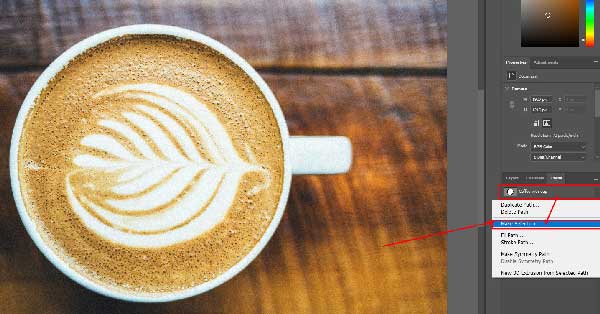
2. Selection from path panel:
For the selection of any path, you can use the saved path. First, select the protected path by the cursor. Click the right button of the mouse. You will get a sub-menu box. From here, click on the “make selection” part:
After clicking the “make selection” part, another box will appear to allow the next action by giving the feather option. Give feather radius 0.5 for a clean and smooth edge. Do not change the other thing for its default value:
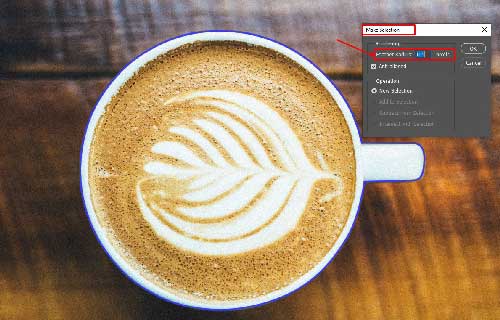
After giving the feather and click ok, the selection will create:

3. Selection from Sub-menu bar:
The selection from the top sub-menu bar is similar to the path panel. First, select the saved path that is named “Coffee with cup.” Then click on the selection from the top sub-menu bar. A feather radius box has to allow by giving 0.5 value. Then the selection will look like below:
How to isolate an object from the background
For creating a transparent background or isolate the object from the background, you have to cut out the background. You can do this easily because your path is now in the selection condition.
So you can remove the background in two ways:
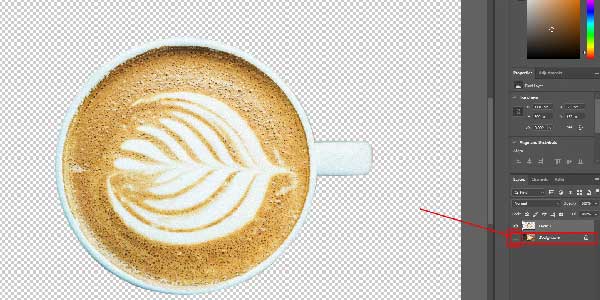
a)Removing a background by copying a selection:
To remove the background by copy, you have to take command’s help from the keyboard.
So, your image is now in a state of selection. Keep a selection on the saved path, then click “CTRL+J” from the keyboard. It will isolate the object and remove the background. But this action will create a new layer under the “Layer” panel. So, you have to click on the layer panel now to see the change. After that, invisible the original background layer. Then transformed image will reveal:
b) Removing Background With Layer Mask
Keeping the selection, go to the layer panel. Here another method you can apply. That is the layer mask. You will find the layer mask option from a toolbox just below the layer panel. Before using the layer mask, first, unlock the background and make it a layer. Because, under the lock condition, you cannot edit the background layer. To open the layer, double click on the background lock icon right side:
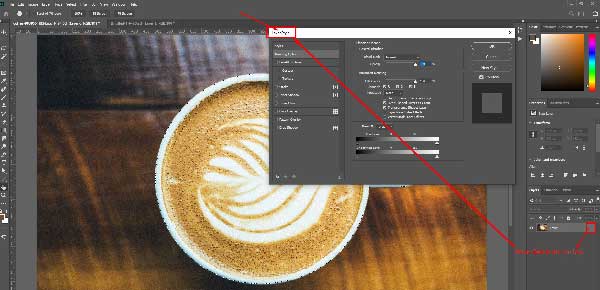
When background converts as a layer, a new dialogue box will appear named “layer style.” Please do not change anything from this for its default value. Then press “add layer” options:
At last, the final transformed image will look like this:
Other Photoshop Pen Tool options
Can you use other Photoshop Pen Tools?
All the time, we have to explain details about only a pen tool in Photoshop. But, in Photoshop, you will find another two tools for making a path. These tools are not convincing, but you may get a contingent result if you practice more with them. It is tough to get skilled with these tools. So let’s get some work by applying this tool:
a) Curvature Pen Tool:
This tool is handy when you will draw any curve. It makes the curve between two anchor points without making any handle. In the pen tool, the angle is created by the handle. But with a curvature tool, you can make the curve without creating any handle.
First, place an anchor point. Then create a second anchor point a little far. The second anchor point work here as a handle. Adjust the curve by moving the mouse cursor. Remember, you have to draw across the image’s edge.
In which point the turn is created perfect, place another anchor point on that. This way, you can make an ideal curve like a circle. You can also adjust the path similarly pen tool after finish the path. This tool is handy for circle images like an orb, globe, arch, ball, etc.

b) Freeform Pen Tool:
This tool work as a freestyle. You could not place or drag any point when you draw this path. It needs to create at a time without releasing the mouse. Very hard to control. That does not give you the perfect shape. You have to amend the entire path after finished the drawn:

C) Magnetic Pen Tool:
This tool works under the freeform pen tool. When the freeform tool is in the selection, the magnetic tool is in sub-option. You can access the magnetic pen tool by checking the magnetic box. However, the magnetic path detects the image’s edge automatically where you do not need to point the cursor. You can also adjust the edge like the pen option: