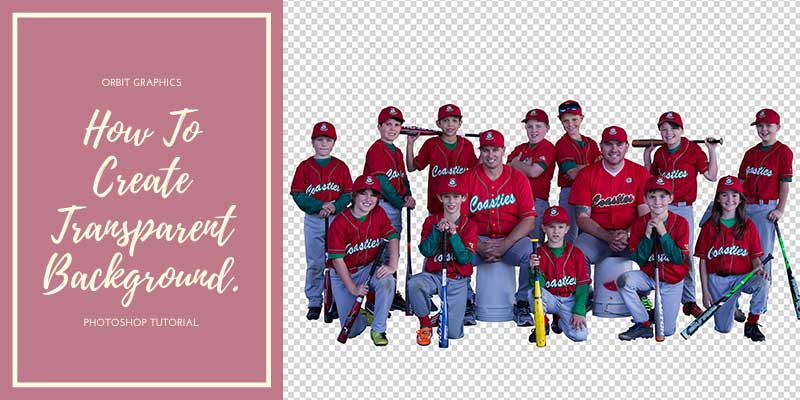
Clipping path is the most popular and widely used techniques in photo editing industry. It is the root of photo editing service specially in product photo editing. This technique is used for some top rated image editing service like image background removal, shadow effect, ghost mannequin effect and more. In this post we will cover ins and outs about clipping path in Photoshop.
Lets start our journey to know everything about Photoshop clipping path.
What is clipping path in Photoshop?

Clipping path is a closed vector path or shape that outlines an object. It is like tracing around edges of an object. This technique is also commonly known as image clipping, photo clipping, and photo cut out, deep etching. Generally, it is used for cut out objects from its background or other objects related in same image. Two major reasons of using clipping path techniques are cutting out object and wrapping text around it.
Importance of clipping path in photoshop
Image background removal is much necessary for professional photographers and online retailers. Sometimes unwanted elements can be added in main objects during photography. For removing and adding any elements, background removal service is must. In ecommerce business, shoppers like to see white background image. Moreover, if you want to use third-party sites like Amazon, ebay, you must upload product photos in white background.
If you need transparent background image, clipping path techniques must be your top choice for great result. You may remove background with various tools in photoshop like magic wand tool, background eraser tool, lesso tools and pen tools. But for accurate edited image using pen tool is the right solution. That’s why; clipping path is needed for image background removal purpose.
Difference between clipping path in photoshop and photoshop image masking
Both clipping path and image masking are used for background removal purpose. But, their applying techniques are different. Clipping path techniques works great for hard edge images like mobile, watch, jewelry and objects like this. And, image masking techniques works well for soft edge image like human hair, fur on animal and objects like this.
As, clipping techniques don’t work well for these portions. Sometimes, editor’s use both techniques in same image like model photography. For body portions, we apply clipping technique and for hair portions, we apply photoshop image masking technique.
When to use clipping path in photoshop service:
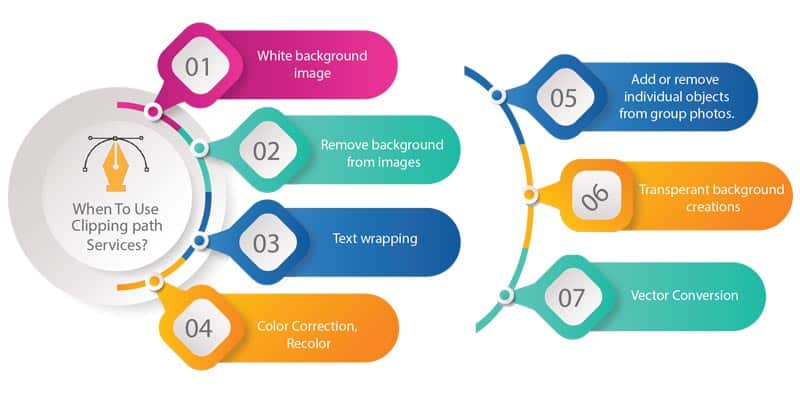
- White background image
- Remove background from images
- Text wrapping
- Color Correction, Re-color
- Add or remove individual objects from group photos.
- Transparent background creations
- Vector Conversion
How to create clipping path in Photoshop:
You may use any version in photoshop for creating path. Almost every version is same. Here is step by step guide for creating vector path.
- Photoshop software like cs5, cs6, or CC.
- Open image in photoshop.
- Zoom in.
- Path layer select.
- Create a new path layer
- Select the pen tool.
- Draw path line
- Use the hand tool to move the zoom image.
- Complete clipping and zoom out.
- Selection and feather.
- Duplicate background
- Add a layer mask.
- Delete the original background layer.
- Save file PSD or JPEG format.
Hello, guys; let’s start with the clipping path in Photoshop. It will seem quite easy to create a clipping path in Photoshop when I show you details with a still shot.
Here I will show you to make a clipping path in photoshop step by step. Please follow my instruction and be happy now; you can also make the clipping path of anything.
Step1: Open Photoshop software like cs5, cs6, or CC
To create a clipping path in photoshop, anything like any products, any model, any jewelry, or anything to do, you need a popular software called Photoshop. Now the question is from where you will get this Photoshop software and which version of Photoshop you need to work.
Let’s take an idea about Photoshop software and version. For creating clipping path in photoshop, something you can use “Photoshop version CS3, cs5 cs, cs6, and any version of Photoshop CC.
You can download any free version form online. Take it easy because every version of Photoshop work almost the same way. Today I will show you how to clipping path in Photoshop CC.
Step 2: Open image in photoshop.
If you have any Photoshop version, then open it. Then you need to load the image in Photoshop for the clipping path. How to load an image in Photoshop, see the steps below.
You can open an image in several ways:
- Drag images from your image location and drop on Photoshop. So the image will open in Photoshop.
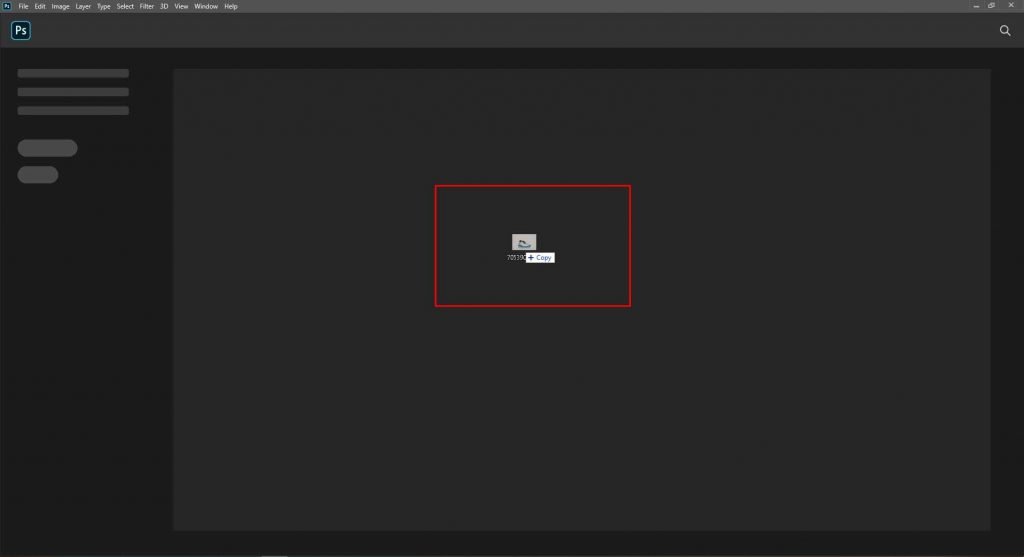
2. Double click image to open and click right site option bar > open with > select Photoshop
version. It will load on Photoshop. First preview image:
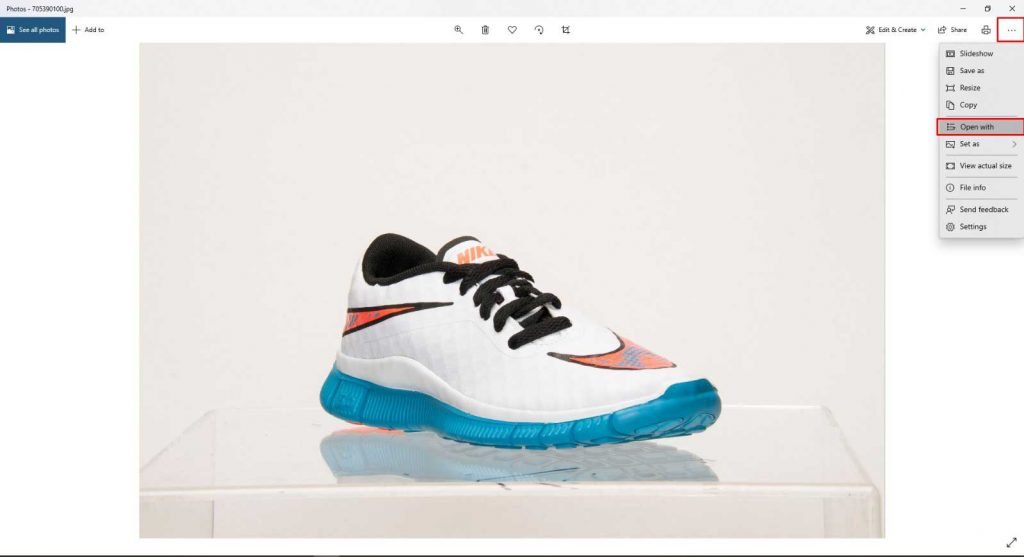
Secondly select Photoshop:
1.
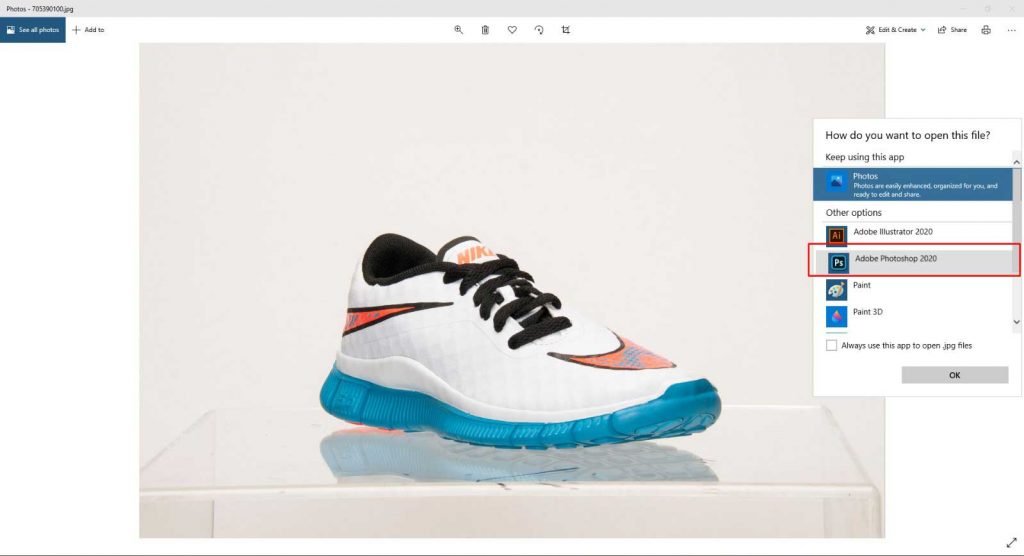
2. Load image from Photoshop. First, go to the top menu bar. Select File > Open. It will show your Desktop table box. From here, you need to go to your image location and select the image, then click open bar.

Step 3: Zoom in
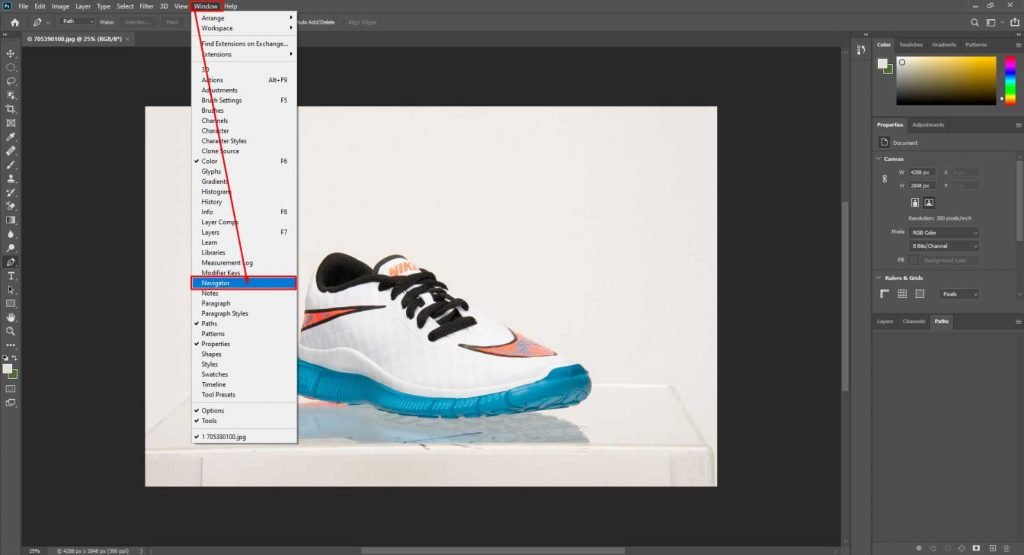
After an open image, you need to zoom 300% percent to see a clear visual edge of the image or zoom image depend on your clear visibility. 300% percent zoom is called basic clear visibilities for all images. But zoom will depend on image regulation, quality, and size because you have to clip the image without damage your image or distorted the image shape. To zoom the image, go to the top menu bar, then select window > Navigator. Here the navigator table will open. From here, you can zoom in and zoom out for work flexibilities. For more details, see the still shot below :
Here you will see zoom in use Navigator table:
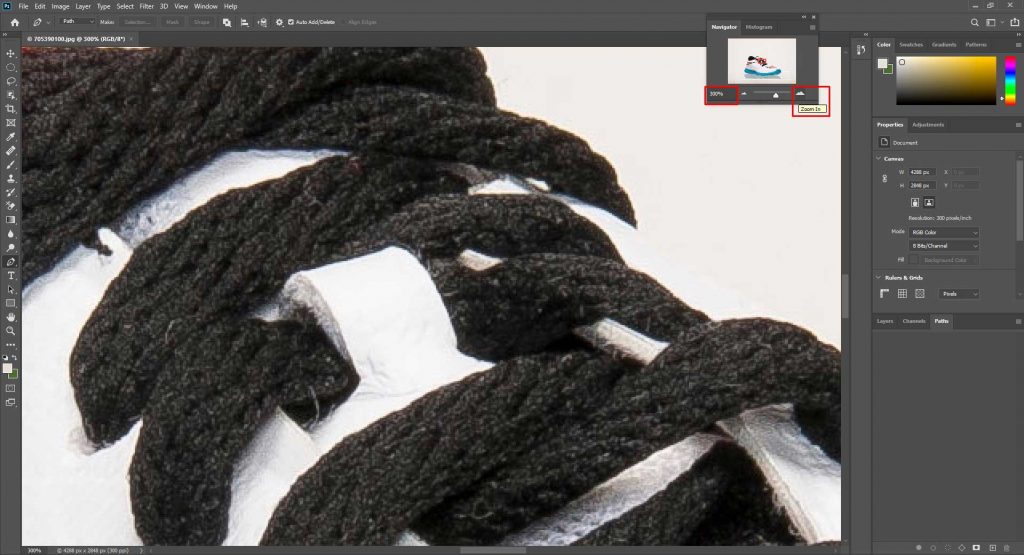
If you want, you can also zoom in and zoom out from the keyboard. Press from keyboard CTRL+ for zoom in and CTRL- for zoom out.
Step 4: Path layer selected.
After zooming the image in Photoshop, first, select the path layer from the right side show below :
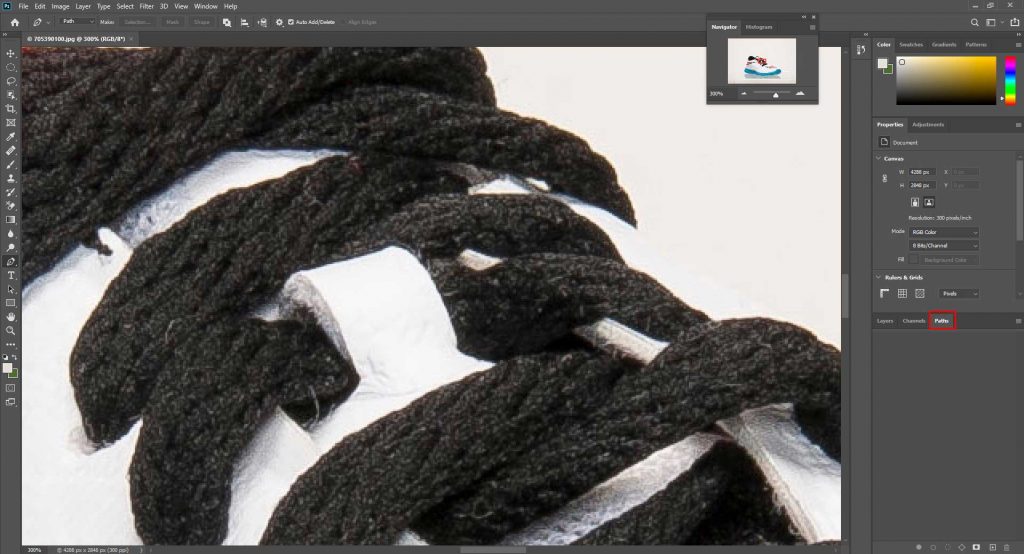
Step 5: Create a new path layer
Now take a blank path layer from the right side bottom. It is called create a new path, and after the click, it will create named path 1. Keep select path 1.

Step 6: Select the pen tool.
After select path 1, you need to take a pen tool for the clipping path. The most effective tool is the pen tool used as usual for the clipping path by hand. To select the pen tool, go left-side toolbar. Here you will see a different kind of numerous tools. From here, you have to select the pen tool. You can also select the pen tool by press “p” from the keyboard. It’s the Photoshop default shortcut.
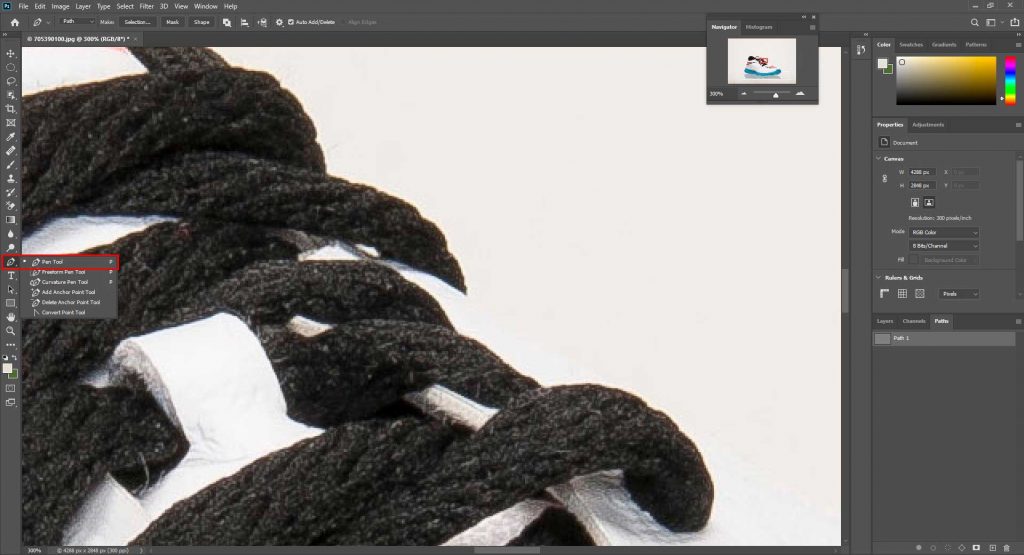
Step 7: Draw path line.
Now let’s start drawing the clipping path by hand with the pen tool. First, take a blank path layer from the right side bottom. Remember, you need to clip the image’s very edge but not draw outside of the image. Click the mouse pointer on image edges now that is showing like a pen. Draw the image like you are drawing by copy-paste by pen. Details showing below:
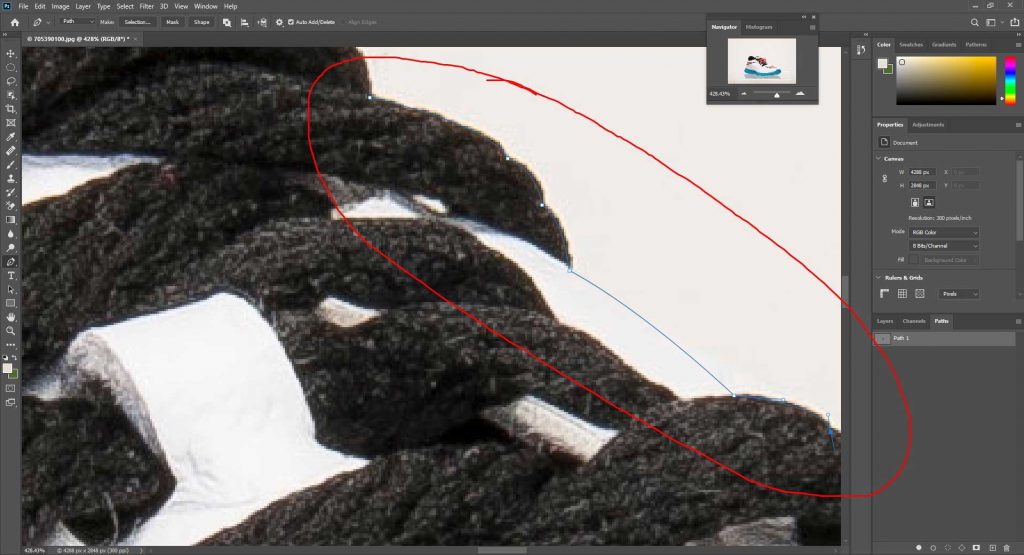
Step 8: Use the hand tool to move the zoom image.
After drawing some lines here, you will face some difficulties. Because you zoomed image 300% percent or more, do not take panic. You can easily move the image with a hand tool for work flexibilities. You can move the image to see the other part of the image. Click the hand tool and use just like the hand to move the image and see the next part when clipping. After moving the image, you need to select the pen tool again to draw the next part. To see the details below:
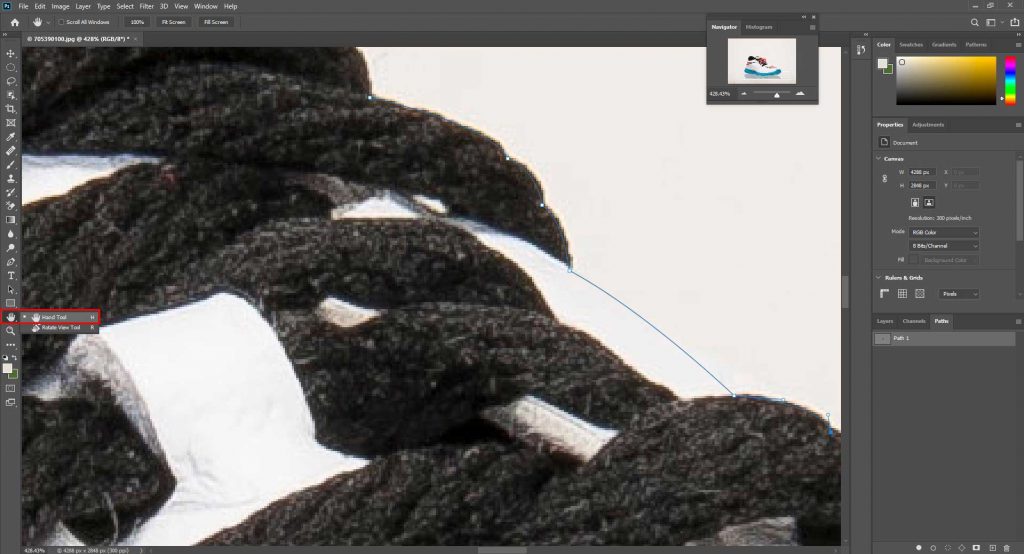
You can also use the space button from the keyboard to use the hand tool to move. The space button is flexible for hand tools when clipping because it will not change the pen tool. So when you need to move a zooming image- press and hold the space button, then move the image click by mouse-like drag and drop.
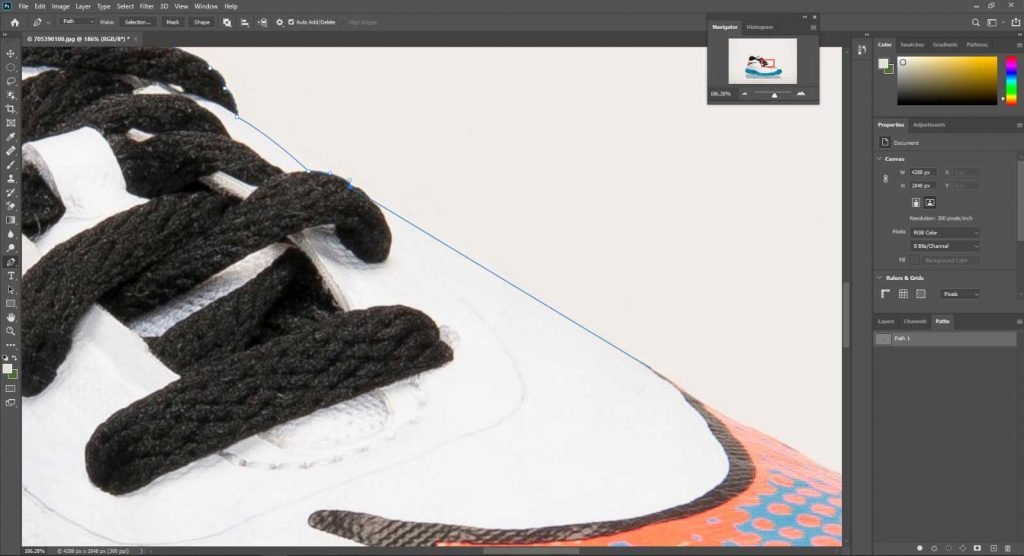
Step 9: Complete clipping and zoom out.
So, guys, you need to draw the clipping path entire image and at the end line, join two points like the first draw line open point and last point.
Once complete, draw the clipping path; then, you need to zoom out the image to see the entire clipping path line. To zoom out, go to the top menu bar, select view > fit layers on the screen.
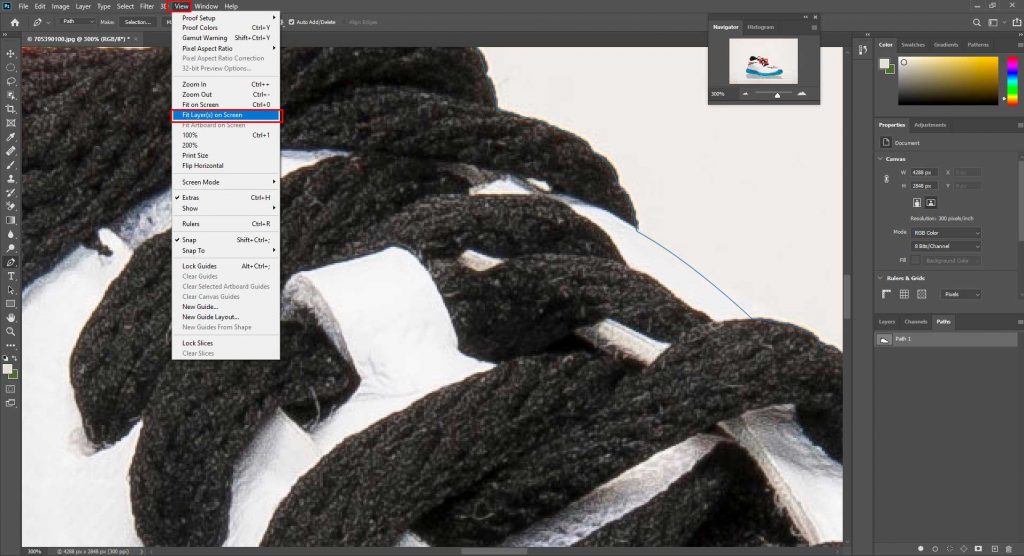
It will take you to the original size of the image again. Or you can press CTRL + 0. It will also work as zoomed out and fit to screen, which is a keyboard shortcut.
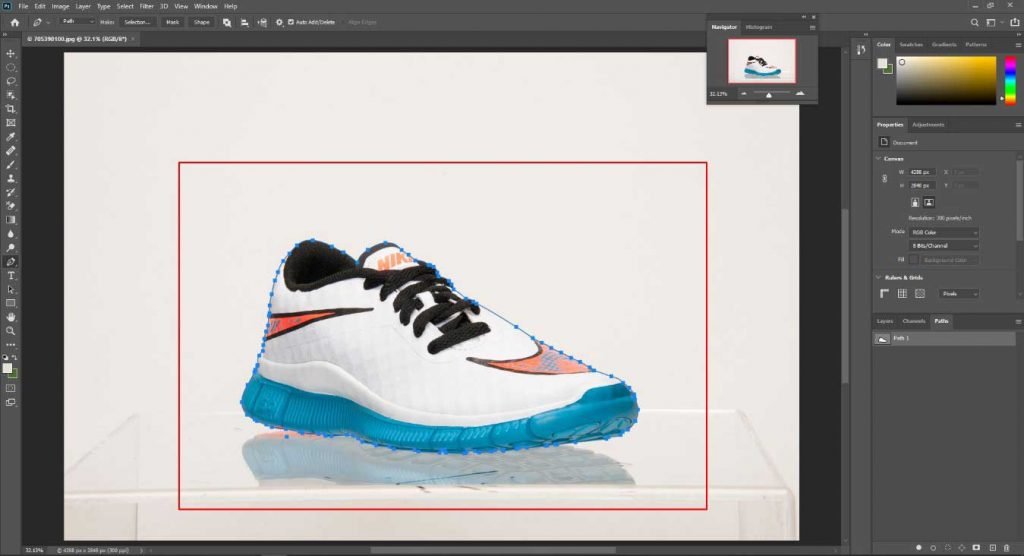
Step 10: Selection and feather.
Now you need to separate your image from the background. It means the background will remove from the image, and the only image will appear. It would be best to keep the mouse pointer on Path 1, then click the mouse’s right button then clicks the selection. To see below:
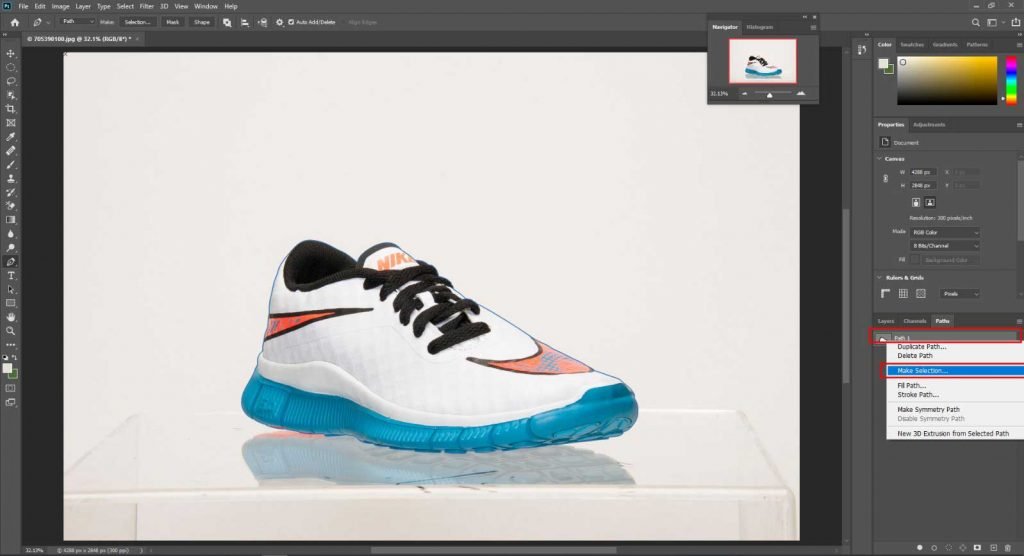
Make selection table box will appear and feather radius select 0.5 mandatory:
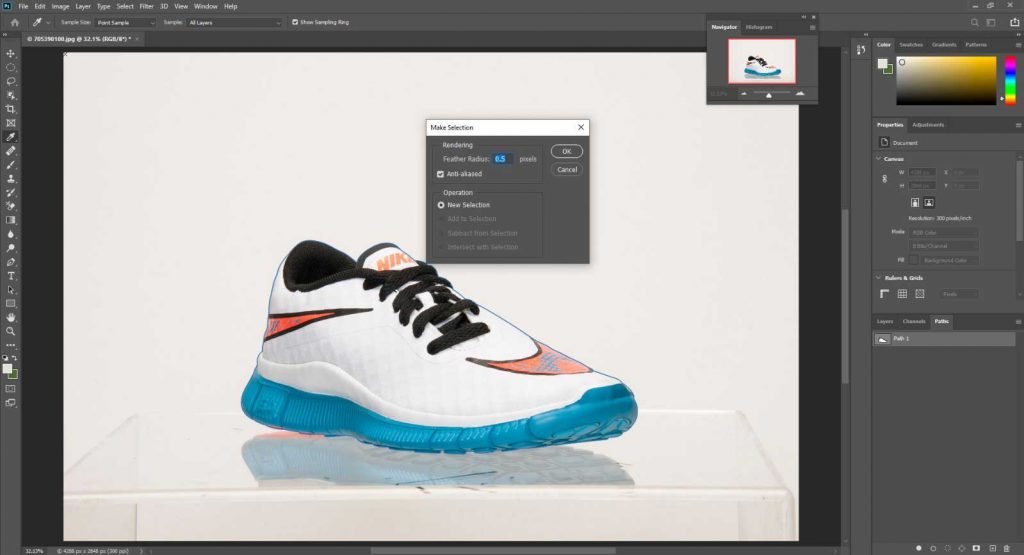
Then click ok and show selection condition like this:

Step 11: Duplicate background
After selection, you need to remove the background and only take the image. So to do this, click the right site Layer bar. Here you can see a layer named background. You need to duplicate this layer by going to the top menu bar select layer> duplicate layer :
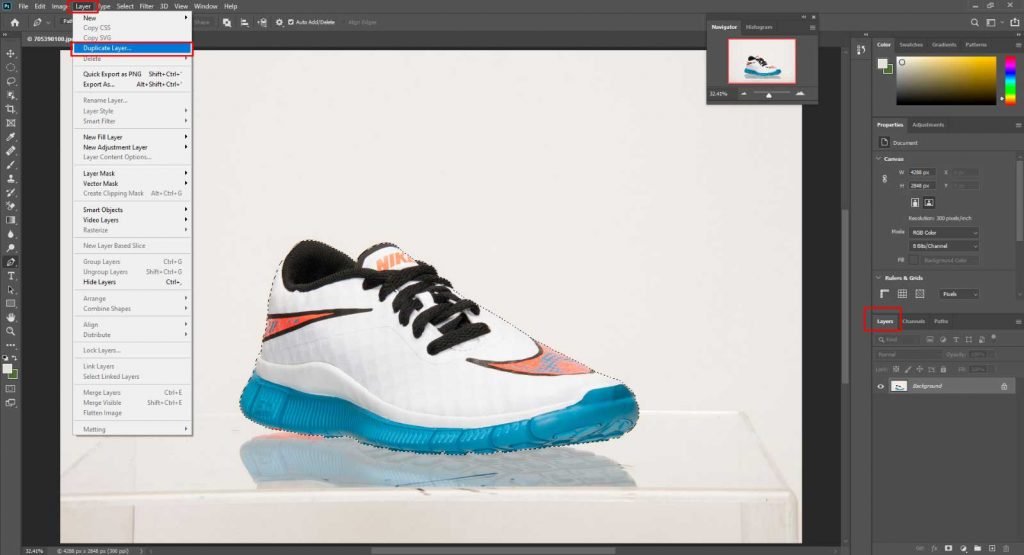
You can also duplicate the layer by press CTRL+J from the keyboard. In this case, the Background name will be changed on the layer.
Step 12: Add layer mask.
After making a duplicate background layer, press adds a layer mask that will show like below :
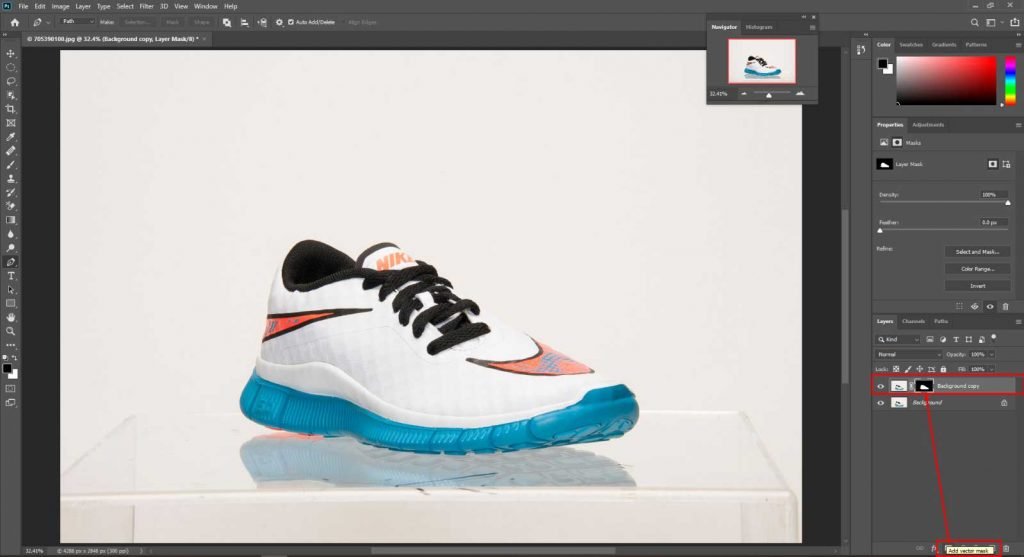
It would be best to add a layer mask option because it keeps your original background preserved for future needs.
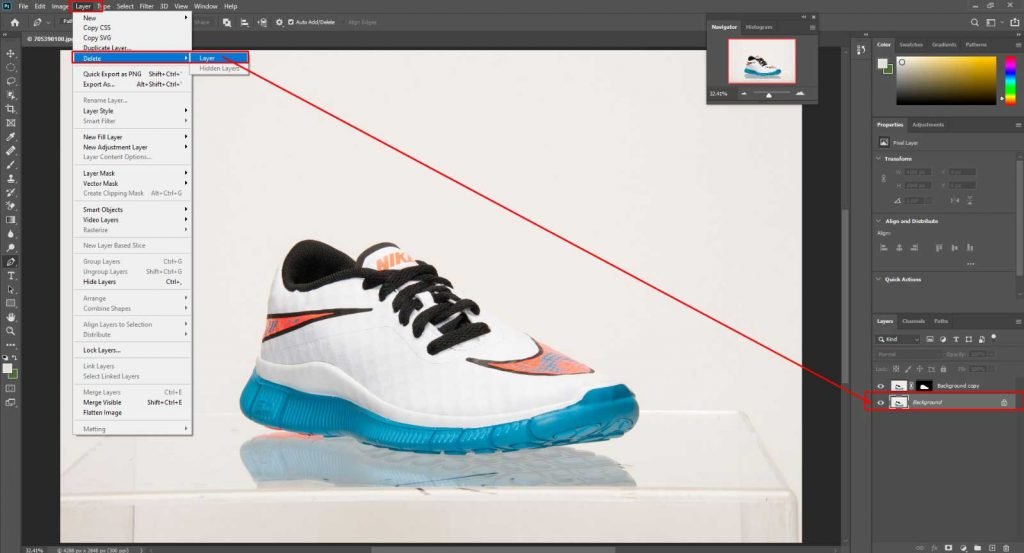
Step 13: Delete the original background layer.
Now delete the only background and see your image ready to use any background, website, or e-commerce site. The final clipping path image result will appear like this :
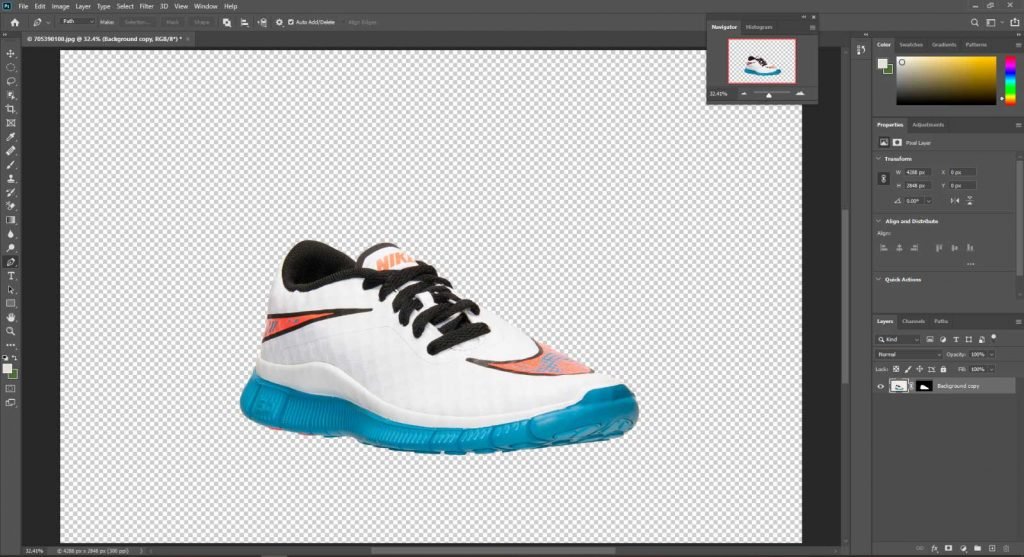
Step 14: Save file PSD or JPEG format.
At last, you need to save the final processed image. You can save images in different formats as your need like “PSD,” “JPEG,” “PNG,” “TIFF,” and other formats also. But these formats are most used and work favorably. Here I will show below how to save an image in the “PSD” format. Go at the top menu bar select file> Save As.
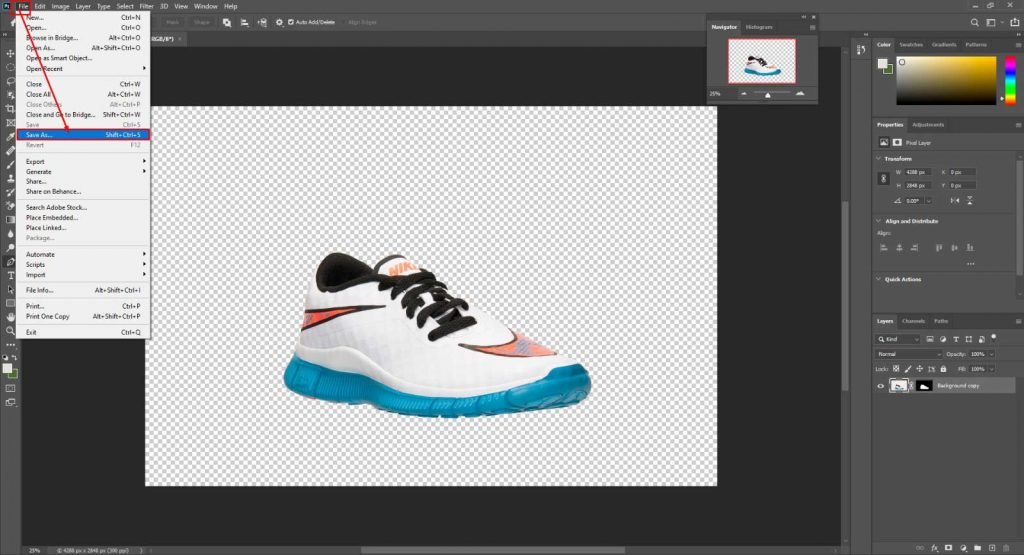
Ater click Save As an option, it will show save as box like below :
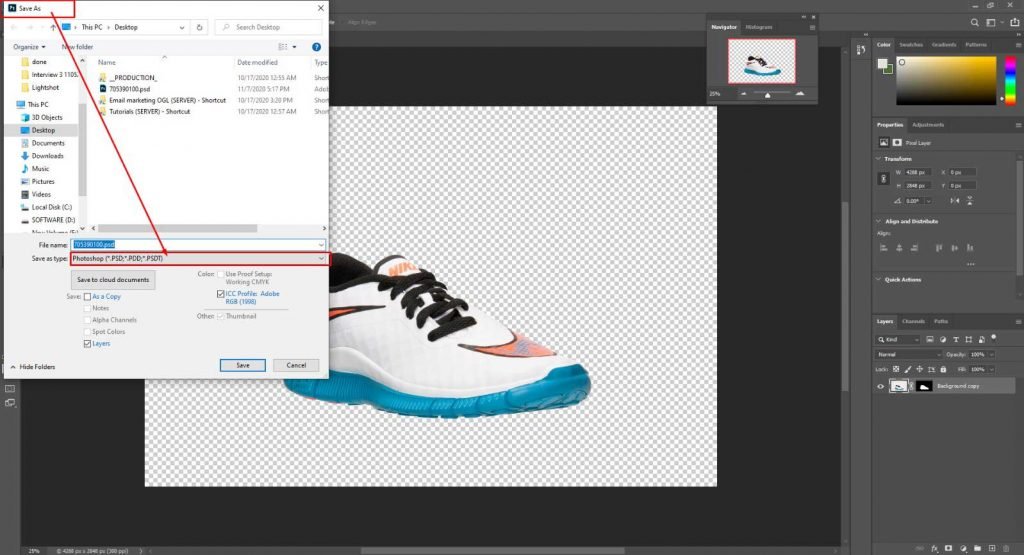
Then click the save button, and the file will save in the “PSD” format.
Hand Drawn clipping path in photoshop Vs Automate Clipping path:
Yes, it is very easy to misguided while using clipping path service. Which one should I take hand drawn clipping path in photoshop or automate vector path. Automate vector path enables you making your path automated. Just upload your images and select path. The tools will automatically drawing a vector path for your image and finally you will get a transperant background photos.
Undoubtedly, it can save your time and money. As, manual clipping service is labor intensive work. But, the problem is its accuracy. No software can deliver 100% accuracy. And, it is the most important for your image. Because, you won’t be able to use this image in future.
So, it is always advisable to use hand drawn clipping path service. You should always focus on quality not quantity.
Different types of clipping path in Photoshop:
Previously, we told clipping path is a vector path used for creating outline around the objects. After that, we may use it in multipurpose like white background, transparent background, place it in a complete new background, color change, mannequin remove or others. Depending on image complexity and time requires, photoshop experts divide this techniques in multi types.
1. Basic Clipping Path:
Very easy to complete it. Requires a small time. No hole, very straightforward. Needs only few anchor points.
2. Simple Clipping Path:
It requires little bit of more time than basic path. But, still it requires few minutes only.
3. Complex Clipping Path:
It is hard. Lot of anchor points needs to do this. It requires more than 45mintues.
4. Super Complex Clipping Path:
it is more complex work. Extra time is needed to do this perfectly.
5. Multiple Clipping Path:
For separating each individual portion in a object, we apply this method. Basically, for color correction, adding or removing any elements from objects, photographers need this service.


